Menu

Show posts

This section allows you to view all posts made by this member. Note that you can only see posts made in areas you currently have access to.

Show posts Menu

Messages - Pocket

#1
That seems to have done the trick, although I have to say that Brushify is extremely inefficient; it made the program hang for multiple minutes while it did its thing, and multiple minutes after that when I unticked vertex welding. It was like that the last time too; I just had more pressing issues to address.

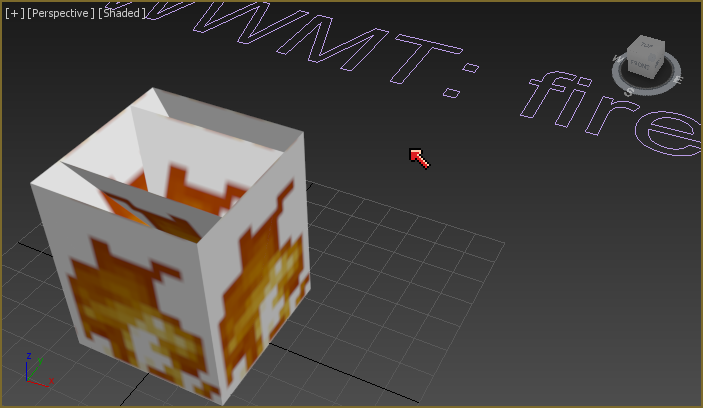
Also the random-black-polygons issue was solved by selecting all the faces and clearing the smoothing groups, which I didn't want anyway. Found that out by accident when I noticed that one face was randomly rendering like it was part of one.
#2
Well, that one doesn't lift the whole thing up by half a unit, but it still leaves the X and Y off by exactly .025 units. It also still produces random black polys, although not as many of them. Any more ideas?
#3
I'm trying to convert the clouds from Minecraft into a 3D model, using the PNG I extracted from the game files. I got as far as figuring out that I could make an Adobe Illustrator file out of it, import it, and extrude it into a 3D poly, but because of the fiddly nature of the tools I used, it doesn't quite line up with the grid. So I went looking for some kind of tool that would just snap every vertex to the grid, and coincidentally my search led me right back here.

I don't know if the script is just broken or if I'm not doing it correctly. What I did was select my object, click the Vertex (three dots) button, drag over the whole object in the top-down viewport, and select SnapVertsToGrid from the Modifier List dropdown. And it... kind of worked? It snapped the vertices to a grid, but definitely not the global coordinates. (See attachment #1) They're all off by exactly .025 in the X and Y coordinates and also the whole thing was moved .5 units upward. It's actually quite similar to what often happens when I try to move multiple vertices manually with snapping on, so I wonder if this script is just an automated version of that? Also, some polygons have turned black (see attachment #2), which I guess means there's some kind of invalid-shape shenanigans going on? They weren't like that before I ran the snap script.

This is in 3ds Max 2022, using a freshly-downloaded copy of the script.
#4
Re-saving as BGR888 and rebooting 3ds Max did the trick. I think from now on I'm just going to use alpha-free versions of the textures for when I build the prop in Hammer, since I'm having to use a separate copy anyway that's outside of /materials/models/. I'm certain that way back when I started this project (using 3ds Max 2013 and whatever version of Wall Worm was available back then) it didn't matter, but it was also so long ago that I have no idea what the process was like.
#5
OK, I see what's happening. I didn't bother importing any textures because I figured they were only needed for previewing the results before compiling. What hadn't occurred to me was that, unlike 3D modeling where UV is defined in terms of percentages of the height and width, Hammer uses absolute pixel counts to store texture alignment, so of course the importer would at least need to know the dimensions of the texture in order to interpret that information correctly.

Anyway, I skimmed the link you posted, and realized I had set the gameinfo directory incorrectly, so I fixed that and reimported... and it's improved the situation somewhat, but not enough. Importing most other VMFs, including other props I'd made for this project years ago (and successfully compiled) works correctly, bringing the textures into /sceneassets/images. (Exhibit A) But a few of them come through with all-black faces and only a relative path in the bitmap parameters. (Exhibit B) And the only difference I can tell is that the ones that don't work have textures stored in BGRA8888 format. So... maybe it really is a bug after all?

Also worth mentioning is that I tried importing some VMFs whose textures were renamed since I last used them, and those came through as cyan instead of black. So it's definitely behaving differently depending on whether it can't find the texture at all or just can't read it.
#6
The picture on the right is with the texture rendering; it's just zoomed into the texture so far that just about all you can see is solid colors. In fact, if I export it, the transparency in the texture that I use to make the chain links hollow covers one of the links and the whole bottom, turning them invisible.

Actually, I'm a dummy; I should have checked the UV chart in HLMV to make sure I was right. Here's what it looks like. I can only spot the faces that I said render as invisible; I don't have a clue where the others are.
#7
A tiny bit of backstory: Since Propper hasn't worked in like a decade and I'm bad at UV mapping, I'm using Wall Worm's VMF Importer and compile tools as a replacement. But I don't think I fully understand how the VMF importer is supposed to work, because the alignment is all wrong. In Hammer it looked like the figure on the left, but once I import it, remove the teal faces representing nodraw, and set the material to point to a TGA copy of my texture, it looks like the figure on the right. So it looks like the UV info isn't coming through correctly. How fix?
#8
I was able to fix the issue, but as I had expected, antialiasing causes the tiniest amount of looping on the top edge. (It looks right in Hammer, but not in game.) I presume this is something that rebuilding the model in Max isn't going to fix, and I'll have to remake the texture with extra empty space around it.

As for learning 3ds Max properly... where do you recommend going for free tutorials? I've got another, more complicated model that I thought I could build using my regular Hammer → VMF import → Wall Worm pipeline, but it keeps coming out with no texture for some reason. I figure I'm better off just starting over and doing it in Max rather than waste any more time figuring out why it's not working. Be easier to get the UV on the edges correct anyway.

Quote from: Joris Ceoen on September 04, 2015, 03:08:19 AM
Quote from: Pocket on September 03, 2015, 09:24:48 PMDo model textures auto-clamp, then? Because when I was working on it in Hammer, there were some bits of the bottom poking out of the top even with perfect fit alignment.
Model textures don't auto-clamp, instead they have much more precise control on how they display the texture. You should always remember that brushes in Hammer are extremely rigid. This is not simply limited to their geometry as the texturing on them can only be planar, and Hammer does not store precise decimals. In other words, you'll often find your texture moved slightly back and forth even when closing and reopening your level.

This, first of all, does not happen when designing your level in 3DS Max with Wall Worm, but it doesn't happen at all on a model, which can store up to X decimals in precise placement of the textures. You won't have any problems in a model which accepts any form of texturing or geometry. That's why Propper is a great tool that unfortunatly can only go so far. Propper is not a modeling tool, it simply converts brushwork into a prop. The problem with that is that it is limited to the same problems as a brush all the way up to the moment the prop is output (to which you can only modify it in 3DS Max).

Finally, clamping is only used on Skybox textures to make sure that there are no seams visible in the skybox, which it usually does if you don't select the options. I'm sure they're ment for horizontal and skybox textures only purposes, because in all my time in Source so far, I have never ever seen the clamping options being used elsewhere.
Quote from: CarbonCopyCat on September 04, 2015, 02:19:27 AM
  • All new engines are now going to use 100% models. No more brushes. Source 2, CryEngine and the Unreal Engine 4 already go up that road.
Yeah, but they still have mapping tools that let you build things, don't they? Surely you don't literally build the whole level in a 3D modeling tool as a single mesh and then export it.
#9
Do model textures auto-clamp, then? Because when I was working on it in Hammer, there were some bits of the bottom poking out of the top even with perfect fit alignment. I'll gladly redo the texture if it won't just cause that issue to come back (it's animated, so I don't really feel like re-exporting every frame with extra padding except as an absolute last resort).

Also FYI there's something seriously wrong with your forum server; I accidentally triple-posted this whole thread because it was just sitting there on the "Connecting to wallworm.net" message for like five minutes and I thought it wasn't working and I was aborting the process by clicking Back.

EDIT: oh and of course posting replies has no delay, story of my life
#10
WWMT Questions / Texture alignment breaking during export
September 03, 2015, 05:47:02 PM
I'm in the process of trying to make a Minecraft-themed map for TF2 (specifically, a recreation of someone else's recreation of Mann Manor), and I'm converting some things into models. So far I've made a torch, a bed, and a chest that opens and closes, but fire is giving me trouble. Here's what it looks like in 3ds Max:


And here it is in Hammer:


No idea what's happened here; it looks like the texture alignment got corrupted somehow. The texture in question has Clamp S and Clamp T enabled and I had some trouble getting it to align ideally when I made the model in Hammer (which I then saved as a map and imported, because I can't be bothered to learn UV unwrapping just for this), but if it looked right in Max then it should have exported without issue, right?
#11
WWMT Questions / Re: Post-VPK folders?
October 17, 2013, 11:35:28 AM
I got it working. My first attempt after I created the TGA files got me an error saying it couldn't find VMTs for some reason, so I tried another location and that one worked. Odd, but workable. Thanks.
#12
WWMT Questions / Post-VPK folders?
October 16, 2013, 04:06:47 PM
Surprised this hasn't come up yet. I guess most Wall Worm users are modders who have their own folder structures set up anyway. I'm working on a thing for TF2, and I noticed that the default folders in Wall Worm's config are all from the pre-VPK era where people used the centralized Source SDK. I've migrated all of my stuff over and removed the SDK launcher entirely, so here's what I put instead:

modelsrc: C:\Program Files (x86)\Steam\SteamApps\common\Team Fortress 2\content\modelsrc
materialsrc:C:\Program Files (x86)\Steam\SteamApps\common\Team Fortress 2\content\materialsrc
mapsrc:C:\Program Files (x86)\Steam\SteamApps\common\Team Fortress 2\content\mapsrc
Bin Dir:C:\Program Files (x86)\Steam\SteamApps\common\Team Fortress 2\bin
Game Info: C:\Program Files (x86)\Steam\SteamApps\common\Team Fortress 2\tf

FGD: C:\Program Files (x86)\Steam\SteamApps\common\Team Fortress 2\bin\tf.fgd

I also entered the model and material folders manually, and saved the settings as a preset called "Team Fortress 2" for good measure. I ran the Material Library Generator and set the material folder to C:\Program Files (x86)\Steam\SteamApps\common\Team Fortress 2\tf\materials, and it seemed to run fine. But when I run the VMF importer, it's not finding the textures; I get blocks of solid color instead. I should mention that this applies to custom textures I've installed to the materials folder manually as well as ones in the game (the ones packed into the VPK files).

Is the problem with the folder paths I entered?
SMF spam blocked by CleanTalk